1 | Download the SketchUp model from the 3D Warehouse
- Download the model from SketchUp Warehouse, using link below
2 | Setup SketchUp Model Tags
- Create Tags for Helix to map as Revit Family Categories
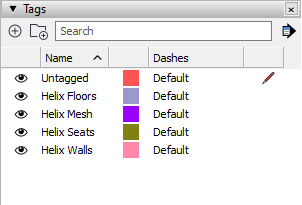
3 | Tag SketchUp Geometry
- Place the SketchUp geometry on the correct tag
- For surface based elements, place the SketchUp face onto the correct tag.
Ex: walls, curtain walls, floors, roofs and ceilings
4 | Map Component in Helix
- Open the the Helix UI by clicking the Helix Icon in SketchUp
- Select the chair component and set it as Mesh (DXF)
- Alternate is to place this component on a tag
- Select the other tags and map them to Revit Categories.
- For more details see: Convert SketchUp Model to Native Revit BIM
5 | Send Mapped Geometry to Revit
- Press Send to Revit button on the SketchUp Helix UI
You should get a Sync Completed notification

6 | Load SketchUp Geometry in Revit
- Back in Revit, press the Load Model button on the EvolveLAB ribbon tab → Helix Panel
NOTE: this example only loads a quarter of the model and a specific portion of seating, hence the ~3600 seat count instead of ~65,000

7 | Swap out the Seat Families (Optional)
- Select all the seat families
- Change the family type to the new type
- Rotate the family if the Helix generated does not have the same orientation by pressing space bar while the seat families are selected

Ideas & Feedback
Here are some ideas that we think could improve this workflow. Let us know if you can think of other ideas.
- mapping the seat family directly in Helix, so that users do not need to swap out the family in Revit
- setting for angle adjustment when mapping, as different families have various orientations
- ability to send the family from Revit as a mappable component in SketchUp